Duroxite® 200

Download data sheet

Select Language

Get datasheet by email
Close

Get datasheet by email

On this page

General Product Description

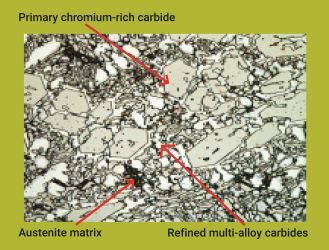
Duroxite® 200 consists of specially formulated abrasive materials deposited on mild steel backing plate that is suitable for extremely severe abrasive wear and high to moderate impact applications. The overlay material is composed of primary chromium-rich carbides and refined multiple-alloy complex carbides dispersed evenly in a ductile eutectic austenite matrix. Duroxite® 200 is available in single and double layers.

Key Benefits

  • Multiple-alloy complex carbides are harder and finer than chromium carbides and interlock between the primary chromium carbides to provide better wear resistance
  • Longer service life and better wear resistance compared to traditional chromium carbide overlay plate
  • Double-layer overlay maintains full wear resistance up to 600° C (1100° F)

Typical Applications

Duroxite® 200 is widely used many industries including mining, cement, and steel. Some specific applications include:

Hide/Show specific columns Edit
Select columns to display
    Mining Chutes, liner plates, conveyors sides, underground mine skips
    Cement Cement furnace components, sinter plant parts, fan blades, mixer blades, gyratory mantles, coal and cement pulverizer rolls, raw material crushing components, molding panels
    Steel Ore sintering, crushing, riddling, blast furnace hoppers, throats, and ovens
    Compare parameters

    Select one parameter to compare

    Comparison

      Mining
      Chutes, liner plates, conveyors sides, underground mine skips
      Cement
      Cement furnace components, sinter plant parts, fan blades, mixer blades, gyratory mantles, coal and cement pulverizer rolls, raw material crushing components, molding panels
      Steel
      Ore sintering, crushing, riddling, blast furnace hoppers, throats, and ovens

      For more information on applications see the Duroxite® product brochure.

      Standard Dimensions

      Hide/Show specific columns Edit
      Select columns to display
        Standard overlay thicknesses
        Single pass
        Multiple Passes
        Metric unit Metric unit
        3 mm on 6 mm 6 mm on 6 mm
        6 mm on 10 mm
        10 mm on 10 mm
        Compare parameters

        Select one parameter to compare

        Comparison

          Standard overlay thicknesses

          Single pass

          Metric unit
          3 mm on 6 mm
          Standard overlay thicknesses

          Multiple Passes

          Metric unit
          6 mm on 6 mm
          Standard overlay thicknesses

          Single pass

          Metric unit
          Standard overlay thicknesses

          Multiple Passes

          Metric unit
          6 mm on 10 mm
          Standard overlay thicknesses

          Single pass

          Metric unit
          Standard overlay thicknesses

          Multiple Passes

          Metric unit
          10 mm on 10 mm

          Other plate sizes and custom thicknesses can be produced upon request.

          Standard plate sizes

          Hide/Show specific columns Edit
          Select columns to display
            Metric unit Imperial unit
            1.2 m x 2.4 m 4' x 8'
            1.4 m x 3.0 m 4.6' x 10'
            1.5 m x 3.0 m 5' x 10'
            1.8 m x 3.0 m 6' x 10'
            2.4 m x 3.0 m 8' x 10'
            Compare parameters

            Select one parameter to compare

            Comparison

              Metric unit
              1.2 m x 2.4 m
              Imperial unit
              4' x 8'
              Metric unit
              1.4 m x 3.0 m
              Imperial unit
              4.6' x 10'
              Metric unit
              1.5 m x 3.0 m
              Imperial unit
              5' x 10'
              Metric unit
              1.8 m x 3.0 m
              Imperial unit
              6' x 10'
              Metric unit
              2.4 m x 3.0 m
              Imperial unit
              8' x 10'

              Other plate sizes and custom thicknesses can be produced upon request.

              Mechanical Properties

              Hide/Show specific columns Edit
              Select columns to display
                Wear properties
                ASTM G65 – Procedure A weight loss 2)
                Number of overlay passes Typical surface hardness1)

                (HRC)
                Typical surface hardness1)

                (HV)
                Surface
                (g max)
                75 % depth of overlay 3)
                (g max)
                Single pass 57 - 60 630 - 700 0.19 0.19
                Double passes 60 - 65 700 - 850 0.12 0.12
                Compare parameters

                Select one parameter to compare

                Comparison

                  1) Surface hardness is measured on machined flat surface just below overlay surface.

                  2) ASTM G65 - Procedure A weight loss, is a standard test measuring sliding abrasion resistance using a dry sand/rubber wheel apparatus. ASTM G65-Procedure A is the most severe test method.

                  3) ASTM G65 - Procedure A weight loss, wear test is conducted at 75% depth of the overlay materials to ensure consistently good wear resistance from the top surface through to the depth of 75% of the overlay.

                  Microstructure

                  The microstructure of Duroxite® 200 contains primary chromium-rich carbides and refined multiple-alloy complex carbides with a typical hardness of 2500 to 3000 HK *) dispersed evenly in a ductile eutectic austenite matrix. The typical volume fraction of primary chromium-rich carbides is maintained between 30 to 40% with 7 to 10% of multi-alloy complex carbides.

                  *) HK is the Knoop microhardness used primarily for very brittle materials or thin sheets.

                  Tolerances

                  Thickness

                  Overall and overlay thickness tolerances can be guaranteed within ±10% of specified thickness.

                  Flatness

                  Plate flatness tolerance can be guaranteed within ±3 mm (±1/8”) over 1.5 m (5’) plate length for plate dimensions equal to or less than 1.5 m (5’) x 3.0 m (10’). For plates greater than 1.5 m (5’) wide by 3.0 m (10’) long, the following flatness guarantees apply.

                  Hide/Show specific columns Edit
                  Select columns to display
                    Standard overlay thicknesses
                    Plate flatness tolerance gauranteed over 1.5m (5'),
                    Metric unit
                    Metric unit 1.8 m x 3.0 m 2.4 m x 3.0 m
                    5 mm on 8 mm 25 mm 41 mm
                    6 mm on 6 mm 25 mm 38 mm
                    10 mm on 10 mm 12 mm 25 mm
                    Compare parameters

                    Select one parameter to compare

                    Comparison

                      For custom sizes, please consult your local sales representative or Hardox Wearparts center for flatness guarantees.

                      Delivery Conditions

                      Duroxite® 200 is normally supplied in an as-welded condition, but can also be supplied in a ground condition upon request.

                      Fabrication and Other Recommendations

                      Welding, cutting, forming and machining

                      Recommendations can be found in the Duroxite® Products brochure, or consult your local technical support representative.

                      Safety precautions

                      When welding or cutting Duroxite® products, gases and harmful fumes are produced that are chemically complex and difficult to classify. The major toxic component in the fumes is hexavalent chromium. The proper exhaust ventilation equipment and fume-extraction torches are recommended, as well as suitable protective clothing and respiratory protection for operators.